


Blogging Tips, Tutorials & Technical Resources
How To Create A Post
Creating your first post can be daunting and, if you are unfamiliar with WordPress, confusing. The following instructions will not only help guide you through how to create a post, but also how to ensure that the different components in your post (text, photo, gallery, maps, etc.) are all compatible.
- Log in, and go to the main Posts page: http://liberatinglens.org/course/wp-admin/edit.php
- Click the Add New button next to the Posts heading
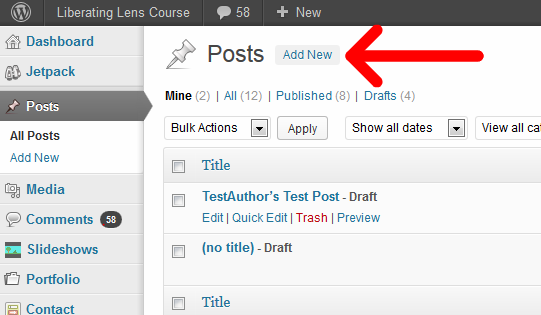
You can also use Add New in the sidebar underneath the Posts heading
- Familiarize yourself with the editor
- Start blogging!
How to upload and insert, resize, align and add a border to your image
- VIDEO http://www.showmewp.com/adding-an-image-using-the-file-uploader/
- http://en.support.wordpress.com/images/
How to Scale Images to a Certain Width or Height
Luckily, WordPress includes an auto-scaling feature that you can use to help resize your images without doing any math. To resize an image to have a certain height or width without making it look squished or stretched, use the following steps:
- Click on the image in the editor
- Click on the blue edit image button that appears on the image in the top left corner.
- Click the Advanced Settings link at the top of the image edit dialog
- Set the Width or the Height to the desired size
- If you entered a Width, delete the Height. If you entered a Height, delete the Width. One box should now be blank, and the other should have a number in it.
- Click the Update button at the bottom of the dialog.
Your image should now be scaled to the height or width you entered.
Help! My Caption Disappeared!
If this happens when you resize an image, don’t worry. You can add the caption back by clicking on the image, the blue edit image button, and then entering a caption in the box.
Taking screenshots
Placing two images side-by-side:
If you have any trouble with this section, please contact Pavel.
1. Insert Your Two Images
Refer to the instructions above if you’re confused about how to insert images.
- Set the sizes of both images to medium
- Be sure to set the captions to contain the appropriate copyright info
- Set the images to be aligned left
2. Add the [clear] Shortcode
To the right of the second image, type [clear]. Your text can start immediately after the clear. It should look like this:
![How to use a [clear] shortcode to place images side-by-side](http://liberatinglens.org/wp-content/uploads/Screen-Shot-2013-10-16-at-2.30.54-PM.png)
-
You can start typing up your assignment immediately after the [clear]. Don’t worry if your image sizes don’t match up right now. We’ll take care of that in the next step.
3. Resize The Images
You have two goals when resizing your images: Keeping the total width of the images equal to or less than 560, and making their heights roughly equal. This will require a bit of fiddling (or math) to get the images and text to line up properly. Refer to the previous section, Image Basics, for instructions on how to auto scale an image. Tweak the images’ heights and widths until they show up next to each other when previewed. Remember:
- The edit window is not a reliable representation of what the post looks like
- The total width of the images should not exceed 560.
How to Embed Video
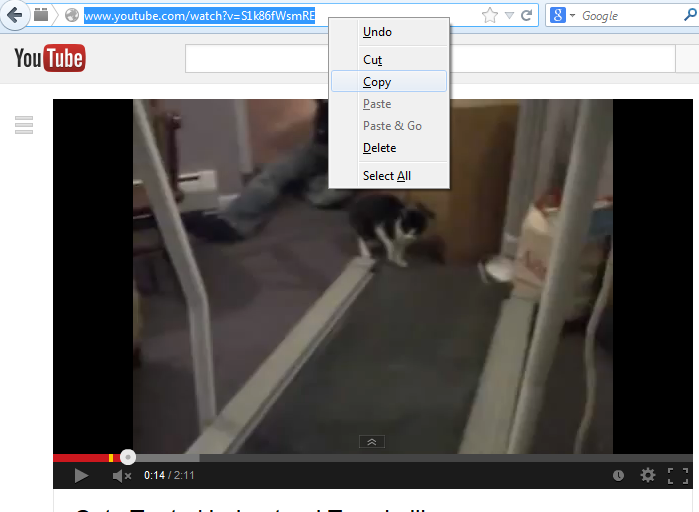
- Find the video you’d like to embed
- Copy the URL of the video from URL bar
This works for a wide variety of video services (full list). If you find one that doesn’t work, email Pavel and he’ll help you out with your post.
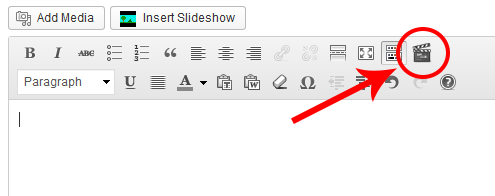
- In the WordPress edit window, click the Embed Video button
- Paste the video URL into the window that pops up

You can do this with video URLs from any of the supported video sites
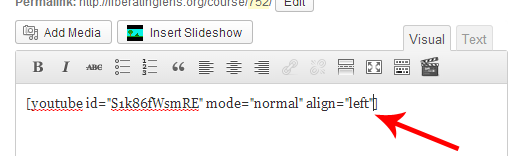
- Fill in the settings as follows: Mode: Normal, align: left

- Click Insert Shortcode at the bottom of the dialog
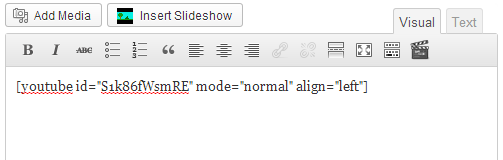
You should now have a shortcode inserted into the post that looks like the following:
If you embed a video from a site other than youtube, the shortcode will start with the name of that service instead. Example: if you embed from Vimeo, the shortcode will begin with “[vimeo id=”…” instead of “[youtube id=”…”
Start times are only supported on videos from YouTube and Vimeo.
Start Times for YouTube Videos
- Determine how many seconds into the video you’d like to start.
- Example: For 1 minute 35 seconds, that will be 60 seconds + 35 seconds, or 95 seconds
- Place the cursor at the very end of the shortcode, to the left of the right square bracket
It should be between the quotation mark at the end of align=”left” and the right angle bracket at the right end of the shortcode.
- Type a space followed by time='” between align=”left” and the shortcode’s closing right bracket

- Type the number of seconds you determined earlier between the quotes of time=””
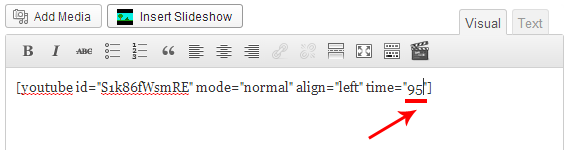
Following the previous example, you would enter 95 between the quotes to start at 1m35s.
Start Times for Vimeo Videos
Setting a start time for a Vimeo video is identical to setting a start time for a YouTube video, except for the last and final steps.
- Determine how far into the video you’d like to start in minutes and seconds
- Example: 1 minute, 35 seconds
- Follow steps 2 and 3 of the youtube start time procedure above
- Between the quotes of time=””, type the number of minutes from the start followed by m, followed by the number of seconds,
followed by s- Example: for a start time of 1 minute and 35 seconds, the time field should now be time=”1m35s”
What is a Gallery?
A gallery is an arrangement of 1 or more images into columns and rows. You can click the thumbnails to bring up a larger view of the photo, and flip through photos in the gallery. Here is an example made with images used elsewhere in the site. Try clicking on the images.
-

- A black and white kitten, Public Domain,

What is a Slideshow?
A slideshow is an area embedded in a post that allows you to display images, text slides, and video in succession.
What’s the difference?
Galleries are better at showing multiple photos at once, and are generally easier to use. They also grab the viewer’s attention and break the flow of their gaze over the page. Slideshows show more detail in the photos at first glance, but at the price of being more difficult to set up initially. Use whichever helps support your post better.
How do I make a gallery?
- Follow the official WordPress Gallery documentation up to Step 4
- In the Link To dropdown, choose Media File
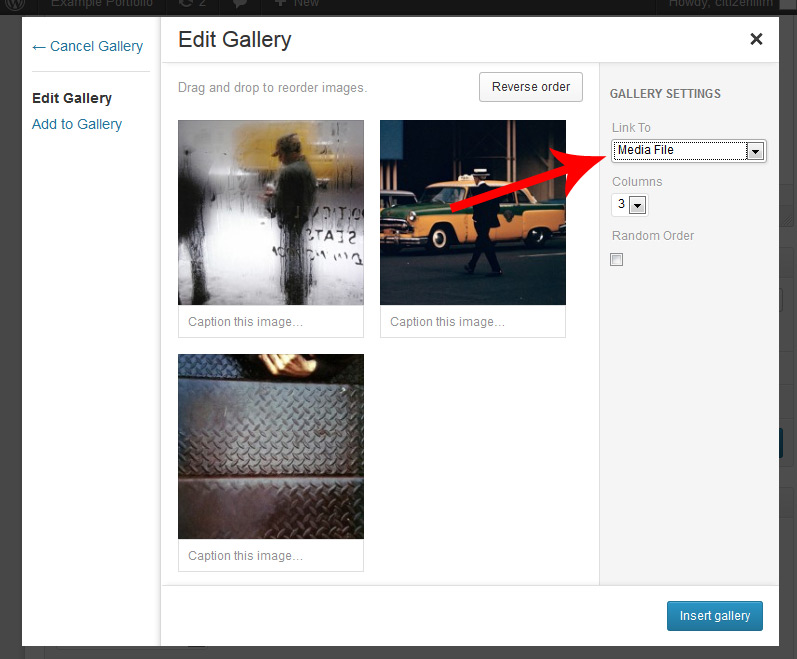
- Finish editing the gallery as directed by step 4
- Click Insert Gallery
How do I make a slideshow?
- If there are any images you would like to use that are not already uploaded to the site, upload them:
- In the sidebar to the left of the edit area, click Media > Upload
- Upload the images you need
- In the sidebar to the left of the edit area, click Slideshow > Add New
- Enter a name for your slideshow
- Add slides to the slideshow using the Slides List area on the right side of the new slideshow view, below the Publish area
- Click the Image Slide button
- Enter a title and caption for the image
- You can add a second line to the caption below the copyright information by typing <br/> before the second line.
- repeat for every image you’d like to add
- Click the blue Publish button in the Publish area
- Return to editing your post
- Click the Insert Slideshow button the right of the Add Media button above the edit area
- Select your slideshow from the dropdown
- Click the blue Insert Slideshow button to on the left side of the resulting window
Creating a personalized & annotated map
Video Tutorial
Step-by-Step Illustrated Instructions
- Login to a google account (either your umich account or a personal one).
- Click on the Maps tab located above the Google search bar.
- Search for a location in the Google search bar.
- Click on the push pin and then press save to map.

- On the drop down that appears, choose create a new map.
- On the left hand side of your screen you can view and edit your maps.
NOTE: Your maps will be listed under “My Places” and then click on “Maps.” - Click the red edit button to edit your map information.
- Then give your map a title and write a short description of what your map is about. Make sure your map is set to Public so that everyone can see the map when it is embedded in your post.

- Click Done. Then, search for more locations following steps 3 & 4 above. Add them to your map.
- At any time when you save a location to your map, you can click on View Map near the top of your screen. When viewing your map, you will see all your locations listed on the left hand side of your screen. From here you can edit what is on your map. Click on a location listed on the left hand side of your screen and then click the red edit button. Since you have a location selected, the red edit button will allow you to modify the attributes of that particular location.
- The description, font, and push pin icon can now be changed.
- Click OK and then done.
- Once you are finished creating your map, Click on the “Link” icon.
- Then, click on the “Customize and Preview Embedded Map.”
- Copy and the embed code from the preview window

- Move to the next section of this toggle


Embedding your map into your Word Press Blog
For most of your work, you will be on the Standard tab, as shown with a Green arrow and will be in the Visual view (as pointed to with a Red arrow). However, in order to embed the code, you want to be on the Standard Tab and switch to the TEXT tab (as also pointed to with a green arrow). When you copy and paste, your content should look similar to the information highlighted in green.

When you click Save and preview, your embedded map will be displayed.
How to Add Footnotes
1. Make the List of Footnotes
- Place your cursor at the end of the page you’d like to add a list of footnotes to
- Click the Ordered List button.
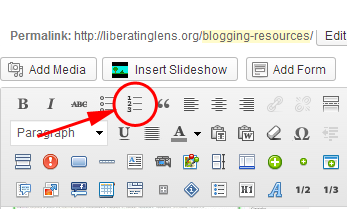
- Add in text for a footnote, and press enter to create a new entry in the list
- To finish adding entries to the list, create a new blank item, and click the Ordered List button again.
2. Add Anchors to the List
- Switch your editing mode from Visual mode to Text Mode
- Find your list. It should look something like this:
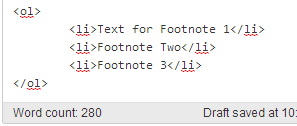
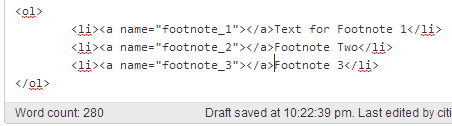
- For every line in the list, add <a name=”footnote_NUMBERHERE”></a> before the text of your footnote. It should now look like the example below:
3. Add Footnote & Links
For every entry in the footnotes list:
- Add the text for the footnote
- Add a link using the Link Button, but instead of URL enter #footnote_NUMBERHERE into the URL box.
Here are additional WordPress tutorial websites to peruse in your free time.
WPMU: http://wpmu.org/
- A mecca of “How To” instructions, comprehensive and easy to read instructions
CreativeBloq: http://www.creativebloq.com/web-design/wordpress-tutorials-designers-1012990
- Provides a list of awesome tutorial sites for those interested in the design elements of WordPress
Show Me WP: http://www.showmewp.com/
- Basic video tutorials
Blogging Tips
Social Media Today – Blogging Best Practices
BloggingTips (Ch. 3 + 4) – BloggingTips.Com Complete Guide to Blogging
Thought Capital – How to Write an Academic Blog Post
Writing Center – Effective Academic Blogging
Comments are closed.